")
")

Our next event:
We will be there again:
27. / 28.04.2024
Alemannenregatta in Salem am Schlosssee
Schade, wir können leider nicht dabei sein
10.5.-12.5.2024
We will be there again:
25.-26.05.2024 Greven
MBG Modellpiraten Greven-Emsdetten
Internationales Schaufahren
29.06.2024 Walfischteich Zwota
We will be there again:
10-11.08.2024
MSK Badweiherhock
MSK St. Peter / Schwarzwald
We will be there again:
31.08.-01.09. 2024
Modellschautage Maxipark Hamm
https://www.ig-schiffsmodellbau.com/

Home drive units, special- and shaft drives Shaft-Drive Gundert rigid drive systems für Baukästen Power-Direct BL Drive 140mm x M2+M4
Power-Direct BL Drive 140mm x M2+M4
Product no.: 3.3230.Fidi.BL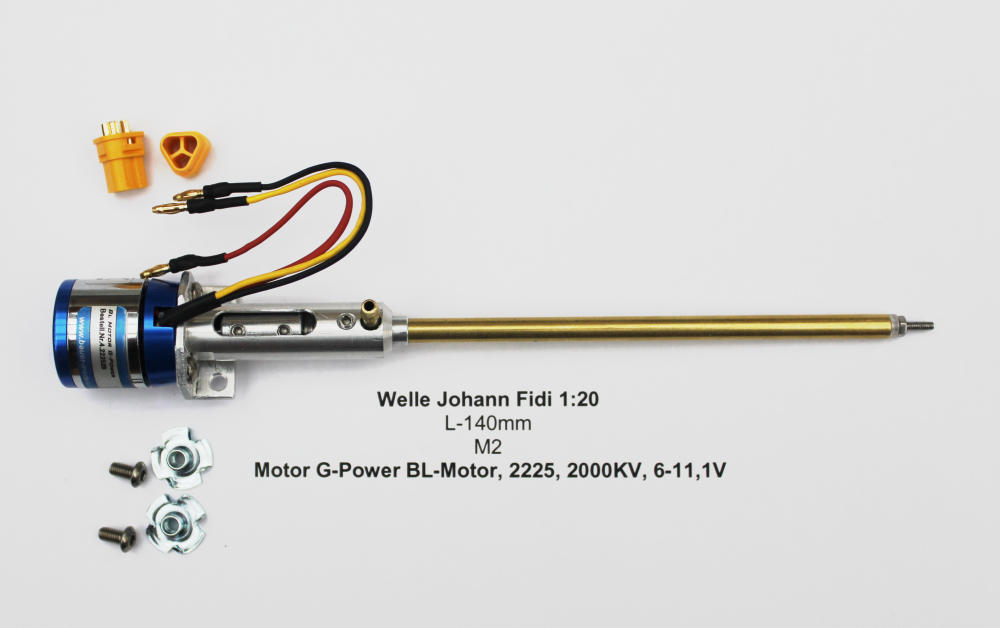
Power-Direct BL Drive 140mm x M2+M4

- with aluminum motor flange, built-in mounting base and coupling
result in a rigid connection between the motor and the shaft tube
dissipate heat from the motor to the shaft tube.
no loss of performance due to misalignment
quick and easy assembly
With motor G-Power BL-Motor, 2225, 2000KV, 6-11.1V
With shaft coupling.
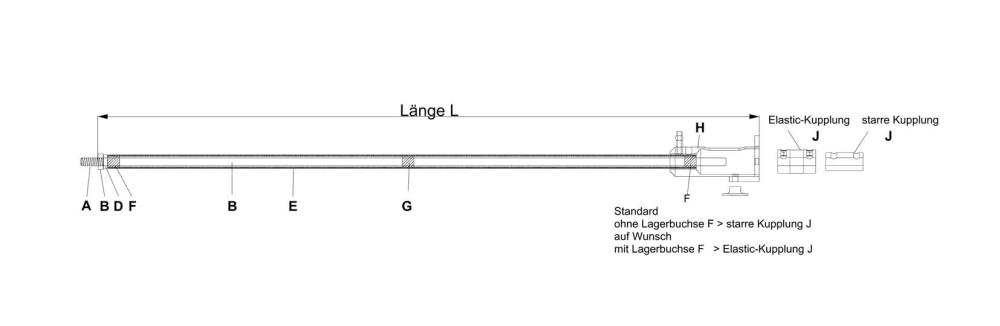
Motor flange H (3.3259) 16mm (BL motor)
Shaft Ø B 2mm
Shaft length 135mm
Tube Ø E 5mm, brass
Tube length 115mm
Length with flange L 140
Thread A M2
Thread length A 6mm
Center bearing -
F 2 metal Teflon bearings with sliding bearings
Thrust bearing B nylon
Coupling J rigid 3.2x2mm
Power max.120W
Total weight 57g
Waterproof.
The 2mm / M2 shaft can be exchanged for the 2mm / M4 shaft. Both shafts are included.
Delivery with BL motor
Advantages of the DIREKT coupling flanges or Gundert-Power-Direkt drive systems compared to all other shaft systems available on the market
- inexpensive
- easy replacement or repairs to the engine. Even if it is difficult to get to the engine screws because the rear or fittings are too tight or the engine screws are difficult or impossible to reach. With this drive system you only work from above.
Assembly of the power direct shaft system
1. Drill out the shaft passage at the stern and push through the shaft system. The shaft tube should protrude at least 1-2mm so that the thrust washer is not stuck together.
2. Make a support out of wood, GRP or similar and fit it into the fuselage under the coupling flange.
3. Place the two drive-in nuts on the support and tighten the coupling flange from above using the M3 screws provided.
If necessary, drill holes for the screws in the base.
Glue the support in the fuselage.
4. Glue the drive-in nuts to the support with 2-component adhesive. Lightly grease the screws to prevent them from sticking.
Dismantling the motor
Unscrew the screws from the drive-in nuts. Loosen the two M3 threaded pins in the flange and the coupling.
Remove the motor with the coupling flange and coupling from the pipe.
Now you can easily work on or change the engine. The assembly is carried out in reverse order. The previous installation position is reached again by the glued drive-in nuts.
Important: Do not use frames that are not in the boat to install the coupling flange. Glue an extra pad into the boat. Otherwise you will lose the advantages of simple dismantling. Assembly or disassembly from above is then no longer possible.
Customers who bought this product also bought
")
Delivery weight: 0.1 kg
|

2307.25GR
4.50 €
*
Delivery weight: 0.05 kg
|

ro1479KR
7.10 €
*
Delivery weight: 0.1 kg
|
")
Delivery weight: 0.1 kg
|

Cardan 35mm 106-40
8.70 €
*
Delivery weight: 0.01 kg
|
Browse these categories as well: für Baukästen, Drive sets for models