")
")

Our next event:
We will be there again:
27. / 28.04.2024
Alemannenregatta in Salem am Schlosssee
Schade, wir können leider nicht dabei sein
10.5.-12.5.2024
We will be there again:
25.-26.05.2024 Greven
MBG Modellpiraten Greven-Emsdetten
Internationales Schaufahren
29.06.2024 Walfischteich Zwota
We will be there again:
10-11.08.2024
MSK Badweiherhock
MSK St. Peter / Schwarzwald
We will be there again:
31.08.-01.09. 2024
Modellschautage Maxipark Hamm
https://www.ig-schiffsmodellbau.com/
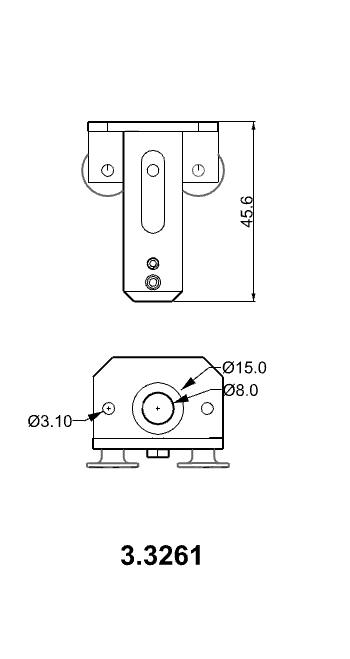
Home drive units, special- and shaft drives Shaft-Drive coupling flanges DIREKT-Coupling-Flange midi 600
DIREKT-Coupling-Flange midi 600
Product no.: 3.3261
Customers who bought this product also bought

Delivery weight: 0.02 kg
|

3.3267
2.60 €
*
Delivery weight: 0.005 kg
|

3.3288
6.50 €
*
Delivery weight: 0.01 kg
|

3.3266
2.60 €
*
Delivery weight: 0.02 kg
|

Delivery weight: 0.02 kg
|
*
Prices incl. VAT, plus delivery
Browse this category: coupling flanges, Intermediate flanges